Advanced: Offline Maps
With GeOrg version you can use offline maps within the application. This is useful if you’re geocaching in areas without network availability or in foreign countries where mobile internet might be expensive or not available at all.
Basically you download or create an offline-version of your favorite maps within a given area. Then you put these file onto your SDCard and tell GeOrg where they are.
GeOrg understands so called Map-Tile-Packs. You can find some ready to use Map-Tile-Packs on the andnav2-download-page. Just download the pack you need and unzip it onto your SDCard.
Your own Map-Tile-Pack
If you’d like a real custom Map-Tile-Pack, you can easily produce them yourself. Here’s how:
First download the Mobile Atlas Creator (MobAC). It’s a great software and it’s free!
Select …
- the Map source (e.g OpenStreetMap, Google, etc)
- the area of the map you want to download
- the Zoom Levels you need (higher numbers equal greater zoom, but also mean much more tiles. The number of downloaded tiles doubles for each further zoom-level you select. You best start with “0” and add single zoomlevels while keeping an eye on the number of tiles, that would be downloaded)
- Now select the atlas format within the “Atlas settings”-section. Right now (from GeOrg 1.1.8 on) you can select “AndNav atlas format” or “BigPlanet SQLite”. Other formats won’t work. (really important!)
… and add your selection to the Atlas’ content. One word of warning: At least with OpenStreetMap there’s a limit on how many Map-Tiles you may download from a given IP per day. Try to stay beneath 100.000!
There’s also a video detailing the process available here
Here’s an example screenshot:
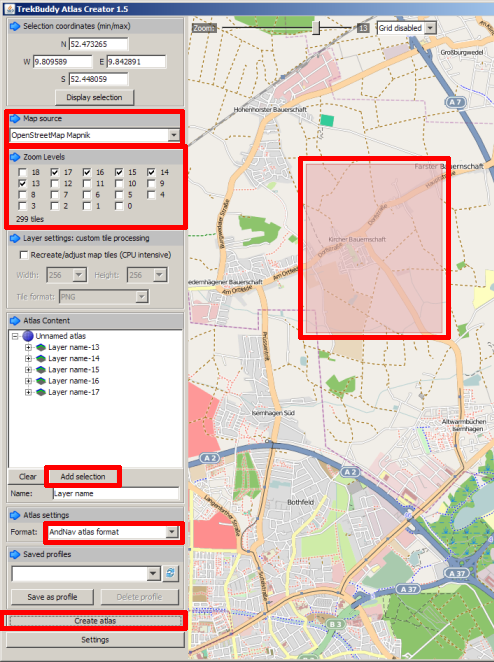
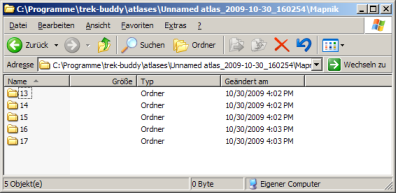
After you have everything prepared, hit “Create atlas” and the Atlas Creator will download your Map-Tile-Pack. When it’s finished, you get a dialog with an “Open Atlas Folder”-button. Go there, select the Atlas you just downloaded and go down the folders until you either find a folder that contains only other folders named like your zoom-levels or an sqlite-file (depending on the Atlas format you chose earlier) This is the file/folder you’ll want to copy to your SDCard. Here’s an example of an Andnav-Folder:
Getting the Map-Tile-Pack into GeOrg
Now that you’ve created or downloaded your Map-Tile-Pack, copy it onto your phone’s SDCard via USB-connection. You can place it anywhere you like.
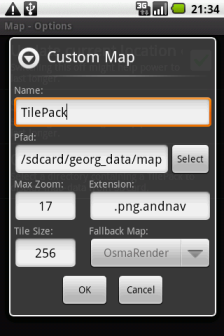
Start GeOrg and go to Settings -> Map – Options -> Offline Map. First you can set a descriptive name for your map. Then select the path to your Map-Tile-Pack with the “Select”-Button. Go down the folders until you get to your sqlite-file (for the BigPlanet-format) or end up in the directory with the subdirectories named like your zoom-levels (for the AndNav-format) and press “OK”. If you did it right, the dialog will display some information about your Map-Tile-Pack like maximum zoom, tile size or file extension.
Finally you can set a Fallback Map. This map is used whenever you zoom or pan to positions on the map not included in your Map-Tile-Pack, meaning that GeOrg will fallback to online maps for that areas, if an online connection is available.
This is how the dialog should look like:
Zipping Andnav-Tile-Packs
One problem with the aforementioned Tile-Packs is that thousands of small image-files are not only slow to transfer to/from a computer. They also tend to take up much more room in the filesystem than their accumulated single files sizes would need. Starting with GeOrg 1.1.8 you can circumvent this shortcoming by simply zipping your Tile-Pack. Just make sure that:
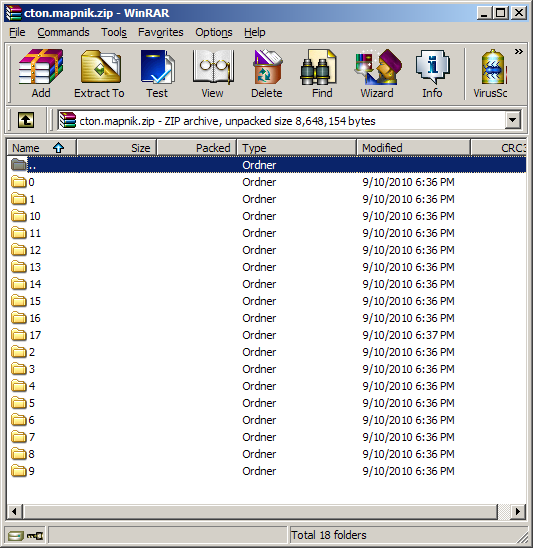
- You put the zoom-level-folders (/0, /1, /2, …) in the root of the zip-file.
- You switch off compression. Compression would not help you much with these already compressed images, but it will take GeOrg longer to draw the map if it has to unzip each and every tile.
Here’s a screenshot of how a zip-file should look like in the root-directory:
Having finished compressing the Map-Tile-Pack, you essentially do the same as with uncompressed Map-Tile-Packs. Only now in the file-dialog, you select the zip-file and not the directory anymore. GeOrg will then parse the zip-file (this takes longer than with ordinary Map-Tile-Packs, because GeOrg has to build up a cache to improve access-speed for the map later) and if everything is ok, will display information about the Tile-Pack in the offline-map-dialog.
Using the configured Map-Tile-Pack
That’s easy. Just go to the MapPage and select the Custom Map-Type. GeOrg will switch to your Map-Tile-Pack. Please note, that GeOrg will not automagically change the position of the map depending on the map source. If you have not defined a Fallback Map, you may now see “no data”-tiles. Here it’s useful if you have downloaded all zoomlevels starting with 0. In this case, you only have to zoom out until you see map-tiles again and then zoom in at the correct position. Or, you switch back to an online map source, pan the map to a position that’s in your Map-Tile-Pack and switch back to “Custom” there.